Showing posts with label business tips. Show all posts

Monday, September 28, 2015

Back to Business

Thank you for letting me share all about our Chicago trip last week. And thank you for those that stopped by and commented! Today I'd like to get back to business and talk a little bit about Etsy's Vacation Mode feature.

During our trip was the first time I've ever put my shop on Vacation Mode since opening in January of 2008. For every other vacation I've taken (even a week in Mexico!) I've left my shop open and answered questions and sent thank you convos to buyers.

https://www.etsy.com/help/article/199
I have to admit, I was a little scared using vacation mode. I'd heard horror stories about not getting back into Google's search for weeks and "losing your place" in Etsy's search. But I had also heard from a couple friends who had recently also put their shops on Vacation Mode with no trouble. So that put my mind at ease a little.
 
https://www.etsy.com/help/article/199

And to tell you the truth, it didn't take long for things to be right back to normal. I had nothing to worry about. I think it helped that I had a few orders that were waiting to come through when I left. So those orders came through immediately after I returned since my buyers were already lined up and waiting. I also think it helped that I had a handful of items that had expired while I was gone. So renewing those got my shop back into search rather quickly as well.
So my advice...Enjoy your vacation! Don't be afraid to put your shop on Vacation Mode a few times a year. While I won't use it for little weekend getaways, I will use it more often in the future.

What advice or thoughts do you have about Vacation Mode? Please share in the comments.

Thursday, March 19, 2015

When Free Really Isn't Free

As I mentioned on Tuesday, I participated in a very large bridal fair last Sunday. I had looked into doing this show for a couple of years, but just couldn't justify the cost. A normal booth at this show costs $850! So when the organizers sent out a chance to win a free booth, I jumped on it right away. The first 50 people to respond got a free 5' x 10' booth.
  
While this is a very small space, I knew I could make it work. And hey, it was free! But then the organizers mentioned that this booth would be 5' wide and 10' deep. Hmmm...how was I going to make that work? 5' deep and 10' wide would have worked great, but I just couldn't find a way to make the narrow booth work. So, cost #1...$300 to upgrade to a 10' x 10' booth. I did also get the bride's lead list with this upgrade as well, which will come in handy for contacting the brides.

Then I went to a meeting for all the vendors and found out that my upgrade did not include a listing on the website. So, cost #2...$100 to be added to the official website. The organizers made a good point that if someone remembers your items, but has misplaced your information, they will go looking on the show's website. If they cannot find you there, they may go with a competitor who is on the site instead. And I did have one bride tell me that she visited the website the night before the show and knew she wanted to stop by my booth. So that made me feel a little better about the extra cost.

Also at the meeting, we were giving forms for renting tables and table clothes. I normally bring my own tables and coverings to shows with me. But since I had a show the day before the bridal fair, I didn't want to have to mess with unloading the tables and reloading them for the bridal fair. Also, my tables are only 5' long and I could rent 8' tables, a tall cocktail table and white table clothes. I'm really glad I went with the white coverings as I think they helped my items stand out well. So, cost #3...$65 to rent tables and coverings.

I also saw a really cool idea online for a cupcake stand that I thought would make a really cool display for my invitations and guest books. I really thought this was something my dad and I could just throw together at a minimal cost...WRONG! Above is the inspiration for my displays. I wanted 18" tree slices with tree limbs in between. Well, come to find out, unless you kiln dry the tree slices, at the size, they will warp...a lot...and very quickly! So I went to a local saw mill to see what other options I had. They made me some really nice oak circles that I could do the same thing with. When I got the cost, they told me the board foot cost and the hourly labor cost, but never mentioned how many hours they thought they would take. We had a huge misunderstanding on the price, but in the end, I had to pay it. So, cost #4...$435 for new displays!! (Live and learn!)

I also printed special brochures for the bridal fair that had photos of my most popular wedding items and pricing for them as well. I also printed business cards to hand out with the brochures. For a giveaway item, I engraved wood wine bottle stoppers with a coupon code and my Etsy web address. I also ordered a banner for my booth as well. I realize this is all part of doing business and advertising is essential for continued business, but most of this cost was directly related to this specific show. So, cost #5...Between $400-$500 for advertising/marketing.

In the beginning, I thought $850 was way too much to pay for a booth at this show. But in the end, I spent about $1350 for this booth!!! I realize the cost of the advertising/marketing materials would have been an additional cost whether I paid for the booth or not and the cost of the displays would have been additional as well. But I wanted to break down all the special costs that went into this specific show. So next year when I'm deciding whether to participate or not, I'll know that if this year's show was a success, it won't be any problem to just pay for the full booth up front :)

Have you had to learn any lessons the hard way lately?

Thursday, June 6, 2013

Being My Own Boss - 1 Year Anniversary

via
Last Saturday I celebrated one year of being self-employed full time! This has seriously been the most amazing year of my life! I love what I do and I love that I get to do it every day! That's not to say it wasn't a difficult decision at the time, but it's been the most rewarding one I've ever made.

I put together a few pieces of advice that I've learned during my first year of being my own boss. If you're thinking of taking the leap, I hope these tips will help you :)

via
 1. Love What You Do This may sound like common sense, but it really is true. What you used to do as a creative outlet or to relax is what you'll be doing several hours a day...every day. Make sure your "hobby" is something you are willing to turn into a "job". That being said, if you love what you do, your "job" isn't really "work".
I absolutely love what I do and I'd be doing it even if no one paid me. I love coming up with new designs and new ideas. I love watching things come to life in the laser. I love being creative. And I love working with my customers.

via
2. Be Prepared to Work Long Hours Unless you're lucky enough to afford an assistant, be prepared to put in a lot of hours. This comes back to loving what you do. Unlike in the corporate world, the more effort you put into your "job" the more you'll get in return. You have to work for what you want and this can require long hours.
On a normal day, I generally work 12-16 hours. This includes everything from packing orders, answering emails, blogging, making product, listing product, etc. I also work weekends and holidays. When I worked my factory job, I used to count down the days til Friday. But now everyday is a Friday and it's great! I can also take time off whenever I want too :)

3. Wear Lots of Hats As a business owner of a one-woman-show, it is necessary to be able to multitask and prioritize your time. You have to be the owner, marketing director, buyer, accountant, secretary, creative director, maker, etc, etc, etc. It would be fun to just create new things all day, but there is much more to it when running a business.
Every day I make a to do list of things that need done that day. I start my day be answering emails and reading blogs. Many times I'm also running the laser while I'm on the computer. I then package orders so the mailman can pick them up (and save me a trip to the post office). Then I get to start creating :) At the end of the day I do my quiet work. I list new items, answer more emails and write blog posts.

via
4. Go Over Your Budget (then go over it again) You might think this should be at the top of the list. While it is very important, I still think loving what you do is more important. Yes, you need to pay your bills, but if in six months you're burnt out, you won't be making any money. So make sure you love what you do before you even consider working for yourself full time.
I ran numbers for several months before I knew for sure that things would be okay. I knew exactly how much I needed to make and I knew I could do it. I also made the decision to sell my SUV. It wasn't a necessity (we have a spare car) and the payment wasn't worth having to stay at my factory job any longer. It felt great being out from under that payment and knowing I had that much more wiggle room with our budget. It is also important to talk over the budget with your spouse/domestic partner/room mate/whatever. Convincing Jesse things would be okay was a little trickier than convincing myself. It was a huge step and we both needed to be on board. After a few good talks, we both agreed it was time :)

I hope these tips help those of you considering working full time for yourself. While it is a lot to think about, if you're able to, I recommend it to anyone. I am a much happier, more satisfied person working for myself. Every day is a "vacation" day, even when I'm at "work" :)
 Those of you who are already working for yourselves full time...any other tips for my readers?

Monday, February 18, 2013

Redesigned Packaging


Last month I blogged about redesigning my magnet packaging so it would fit in a 2" shipping tube for the Umba Box I participated in. This got my brain thinking about how I could redesign it again to be more cost effective.

I used to package my  magnets on metal canning lids. I'd seen the idea somewhere before and thought it was great since the magnets stuck right to the lid. I just slid that in with a paper backer that had my banner and etsy address on it and they worked great. But, the lids can get costly and I like to keep my packaging supplies to a minimum.

After I made the Umba Box magnets, I took that concept paired with my old packaging and made some new packaging. Instead of canning lids, I used repositionable adhesive dots. They're strong enough to hold the magnets in place, but come off easily when you're ready to remove the magnets and use them. I also made the tags a little smaller since they didn't have to accommodate the size of the lid. I was able to buy smaller baggies to put them in and fit 6 tags instead of 4 on a sheet when I printed them.

Just a rough estimate, but I figure I'm saving over a quarter per package of magnets now! It's a small amount, but it can sure add up fast.
Take a look at your current packaging...are there ways you can reduce your costs or improve  your design?

Monday, January 28, 2013

Shipping Rate Increase

Yesterday the USPS announced a rate increase on postage. Stamps aren't going up much, just 46 cents. But boy are packages getting hit hard. And international packages seem to be getting hit the hardest! While most domestic packages are just increasing by a dime or a dollar, international packages are practically doubling. And this includes Canada as well.

Etsy has put together a nice post on their blog covering several commonly used services with the old and new rates so you can see for comparison.
Here is an Excel file of all the shipping services and new rates at the USPS site as well.

I went over my shipping prices on Thursday and started changing the rates. With custom orders I need to be ahead of the game since I won't be shipping until after the rate increase has taken effect. I was afraid international customers would stop buying all together after seeing the rate increase, but I have good news. I've already sold two items to international locations since raising my rates. While some customers may be deterred, customers who want your product are still going to buy regardless of the shipping.

Take a moment today to look over your shipping rates and make the necessary changes so you don't take a big loss on those large rate increases. The good news is, it didn't take me long to update my prices using the bulk edit tool on Etsy. Click on "Your Shop" at the top of the page. Then click "Shipping & Payment" on the left hand side of the page. There is a link that says "Apply Shipping Profiles to multiple listings". From there you can use the drop down menus to change all of your listings at once. Once I got my new profiles set, it was a piece of cake :)

Monday, August 20, 2012

2, 4, 6, 8? Listing Sets

Something I see asked a lot in the forums on Etsy, and that I have trouble with from time to time as well, is listing items in sets.
*Will this item sell as a set?
*How many should I list in each set?
*Should I offer multiple sets?

When I first started listing my wine glass sets, I had them listed as sets of four. To me this just seemed like a common glass set number. I sold a few, but my other glass items seemed to do better than the wine glasses.

I recently had a request for a set of two wine glasses. After the custom listing sold, I went ahead and relisted it as an option for my shop. I tend to do this a lot with my shot glass, beer mug and flute sets too. It gives buyers more options. Just since listing the newly made set, I've sold three more sets of the two glass listing!

Sometimes it's just trial and error that leads to the right answer. After I got to thinking about it, a set of two does make more sense for gift-giving. If you're going to put a couples' names or monogram on a glass, they probably don't need their name on more than one glass :) It's always a good idea to revisit our listings and see what changes we can make.

Tuesday, May 22, 2012

Organizing Local Orders

One thing I love about Etsy is how easy it is to manage open orders. I can scroll through all the open orders and see what still needs done. I can add private notes to orders to remind me of deadlines or special requests. And once they're shipped, they're moved to the closed orders page keeping my open orders up-to-date and organized.

So nice and clean...not for long!
Local orders are a whole other story for me! I'm terrible at keeping them organized! If they're not in my open orders que, I tend forget about them! Not Good!!! I've tried a few different methods, but nothing has worked real well so far. Last fall I tried keeping all local orders in a large zip lock baggie (which is how I organize a lot of my things LOL!) This definitely wasn't ideal.

Yup, that's an envelope...I write on whatever is closest when I answer the phone :)
Over the weekend I finally put to use a cork board I bought a few months ago. I knew I wanted to engrave on it and planned on adding a pretty design, but in the end I went with the straight-forward approach. I engraved "Orders" on it :)

Please excuse my MESSY desk!
So far this is working out well and I have it in a place where I can see it while I sit at my computer. That way I'm always reminded of what's still on the To-Do list! I can hang orders so the closest deadline is on top. And once they are completed, then they can be transferred to my file cabinet so I still have all my contact info and order info.

Maybe I'll have to make some pretty tacks to dress it up a bit. But for now, it's doing it's job...and that's more important than being pretty :)

Tuesday, February 7, 2012

Tax Prep Tips

It's that time of year again...Tax Time! Are you one who waits til the last minute to get your tax papers in order? Do you stress about finding all your receipts? Do you vow to do better next year?
I'm here to offer a few tips on how I keep everything organized throughout the year so taxes are a breeze come the first of the year.
I can't help you much with your 2011 taxes, but but I can help you can get your 2012 taxes organized NOW!
~~~~~~~~~~~~~~~~~~~~~~~~~
I find it best to break taxes into manageable time lines. There are things I enter immediately, things I enter monthly and things I enter quarterly. I use Excel to organize everything, but there are several other ways you can do this. Do what works for you.
Immediate Entries
I have started to enter my local sales on the day I get paid for them. I tend to forget about them if I don't enter them right away.
Monthly Entries
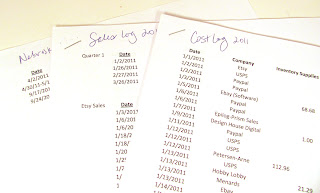
*Each month I print out my Paypal statement and enter the data in the correct column of my Cost Log. You could also copy and paste the data from the CSV download as well. I'm a visual person and like to write notes on my statement, so I print mine out.
*I also keep all of my receipts from the month in a baggie and enter those monthly as well.
*Just this year, I've started keeping a monthly Profit Log. It details what items sold, how much the materials cost, Paypal fees and Etsy fees. It doesn't take into consideration when I buy things in bulk or any other overhead. I just wanted an item by item profit log to see how I'm doing.
Quarterly Entries
I pay my state sales tax quarterly, so I update my Sales Log quarterly as well. My locals sales are already entered, but I transfer my data from Etsy and enter my consignment sales as well. I break my Sales Log into sections so I know which sales I collected taxes on and which ones I didn't. Then I make sure to note why taxes were not collected on these sales (wholesale, out of state, etc.)
Keep in mind that you can do things differently and still stay organized. You can enter your sales monthly if you like and enter your Paypal data weekly, etc. Do what works for YOU. But make sure you do it!
~~~~~~~~~~~~~~~~~~~~~~~~~~~
Have any good tax tips? Share them with us in the comments!

Saturday, January 21, 2012

USPS Rate Increase

January 22nd marks the date for another rate increase for the United States Postal Service. Some of the most talked about increases are First Class Mail, First Class Mail International and Flat Rate Priority Packages.
  • First Class Mail will raise from $1.71 to $1.95 for the first 3 oz. and then 17 cents for each additional ounce.
  • First Class Mail International will start at $3.00 and then will vary by zone for each additional ounce.
  • Flat Rate Priority Packages are as follows

*Small: From $5.20 to $5.35

*Medium: $10.95 to $11.35

*Large: $14.95 to $15.45

~~~~~~~~~~~~~~~~~~~~~
These are some of the most noticable that I've seen, but you can get the complete list with separate XLS or CSV files for each category HERE.

Tuesday, October 11, 2011

Making Connections

I recently had the pleasure of working with Joyce and Gary of JGWoodSigns. They contacted me about a consignment deal which turned into a wonderful transaction. JGWoodSigns does a lot of custom work and for their recent show, they wanted more "cash and carry" items. They loved my engraved coasters and thought they would do well with their items.
Here's how we worked the deal...
They told me which coasters they wanted and how many of each. I also sent along custom samples and order forms. I shipped the coasters to them, they had their show and shipped back what didn't sell. We worked a consignment deal, so they paid me for the coasters, minus the consignment fee. Everything went great!
This isn't the type of deal I would do with just anyone. You have to be cautious of such transactions and do your homework. I had never met Joyce or Gary before they contacted me. They live in a different state and I had never done anything like this before without knowing the people first. I did a little research and saw that JGWoodSigns had been on Etsy since 2008, had sold over 400 items and had 100% feedback. This made me feel good about the transaction. And there was a lot of communication between Joyce and I which also helped me get to know her and feel comfortable about everything.
Consignment isn't for everyone, but it is something to consider and can open doors for more opportunities and sales. This transaction was great and I hope to work with Joyce and Gary again soon :)

Thursday, October 6, 2011

Search Ads on Etsy

On September 28th, Etsy rolled out a new program called Search Ads. What this does is allow Etsy sellers to buy ad space. It is based on keywords in your titles/tags/etc. and you pay per impression. An impression is how many times your ad appears on the top row of Etsy search results. I thought I would give you the run down of my first week using Etsy's search ads. I kept track of my results on a daily basis trying to check the stats at about the same time each day (or night rather). Here are my results: *Day 1: Cost: 66 cents Impressions: 580 Views: 5 Favorites: 0 Sales: 0 *Day 2: Cost: $1.44 Impressions: 1,207 Views: 10 Favorites: 0 Sales: 0 *Day 3: Cost: $2.22 Impressions: 1,818 Views: 13 Favorites: 0 Sales: 0 *Days 4-5: Cost: $3.85 Impressions: 3,170 Views: 30 Favorites: 4 Sales: 0 *Day 6: Cost: $4.54 Impressions: 3,777 Views: 38 Favorites: 5 Sales: 0 *Day 7: Cost: $4.65 Impressions: 3,879 Views: 41 Favorites: 5 Sales: 0 End results (at 6:30 am): Cost: $4.71 Impressions: 3,943 Views: 42 Favorites: 5 Sales: 0 ~~~~~~~~~~~~~~~~~~ ~What I find interesting, is that in that same time period, I had 1,336 Views, 54 Favorites and 13 Orders.~ I have decided to give Search Ads one more week. I had my spending limit at $5 and I will be keeping it the same for this week as well. I suppose if one of those favorites turns into a sale, it was worth my $5. But if at the end of my second week I still haven't seen any results, I'll stick with using that money to advertise in a different way :)
Did you participate in the Search Ads on Etsy? I'd love to have your share your results with us! And stop back next week to see how week two went...fingers crossed!

Monday, October 3, 2011

Accepting Credit Cards at Shows

There are several ways to accept credit cards at shows these days. And they are a great way to open the door to more sales! People like to ration their cash at shows because they usually only bring so much with them to last them the day. When they realize you accept credit cards, they are able to spend more and not wait to by til they have seen everything at the show. So, how do you get started? I first started with a Propay account. And as an Etsy seller, you can get a discount for the annual fee. This service works well, but there are some downfalls. Most shows don't have WIFI, so you have to process the cards when you get home and hope they are approved. You also have to make sure you get all the proper information written down or the card will be declined. I had to learn this the hard way when I got a wrong zip code (and no phone number!). Of course, if you have WIFI on your phone, you can process cards that way. Another downfall (compared to other services) is the fees. Propay charges an annual fee, as well as a fee per transaction. They also charge for their card readers as well. I recently got a smart phone with full internet access. One of the main reasons I wanted this phone is so I could get a Square reader. I have used my reader at two shows now and both times have been a huge success. The reader so easy to use. You just plug it in to the top of your phone, download the app and swipe the card! People sign their name with their finger and you're all done. You can even email them a receipt as well! You also get instant approval with the Square. And the best part...the reader is free and the transaction fees are as low as 2.75%! The one concern I had was that people would not be comfortable with me using my phone to process their card. My concerns immediately went away when I saw how excited people were about the reader! People were fascinated with it and not a single person had a concern :) ~~~~~~~~~~~~~~~~~~~~~~~~~~~~ So I encourage you to start accepting credit cards at shows if you don't already. It is a great way to increase your sales and your customer service level. And the Square reader is great if you do home shows as well! It is so portable and easy to use...go check it out!
Related Posts Plugin for WordPress, Blogger...